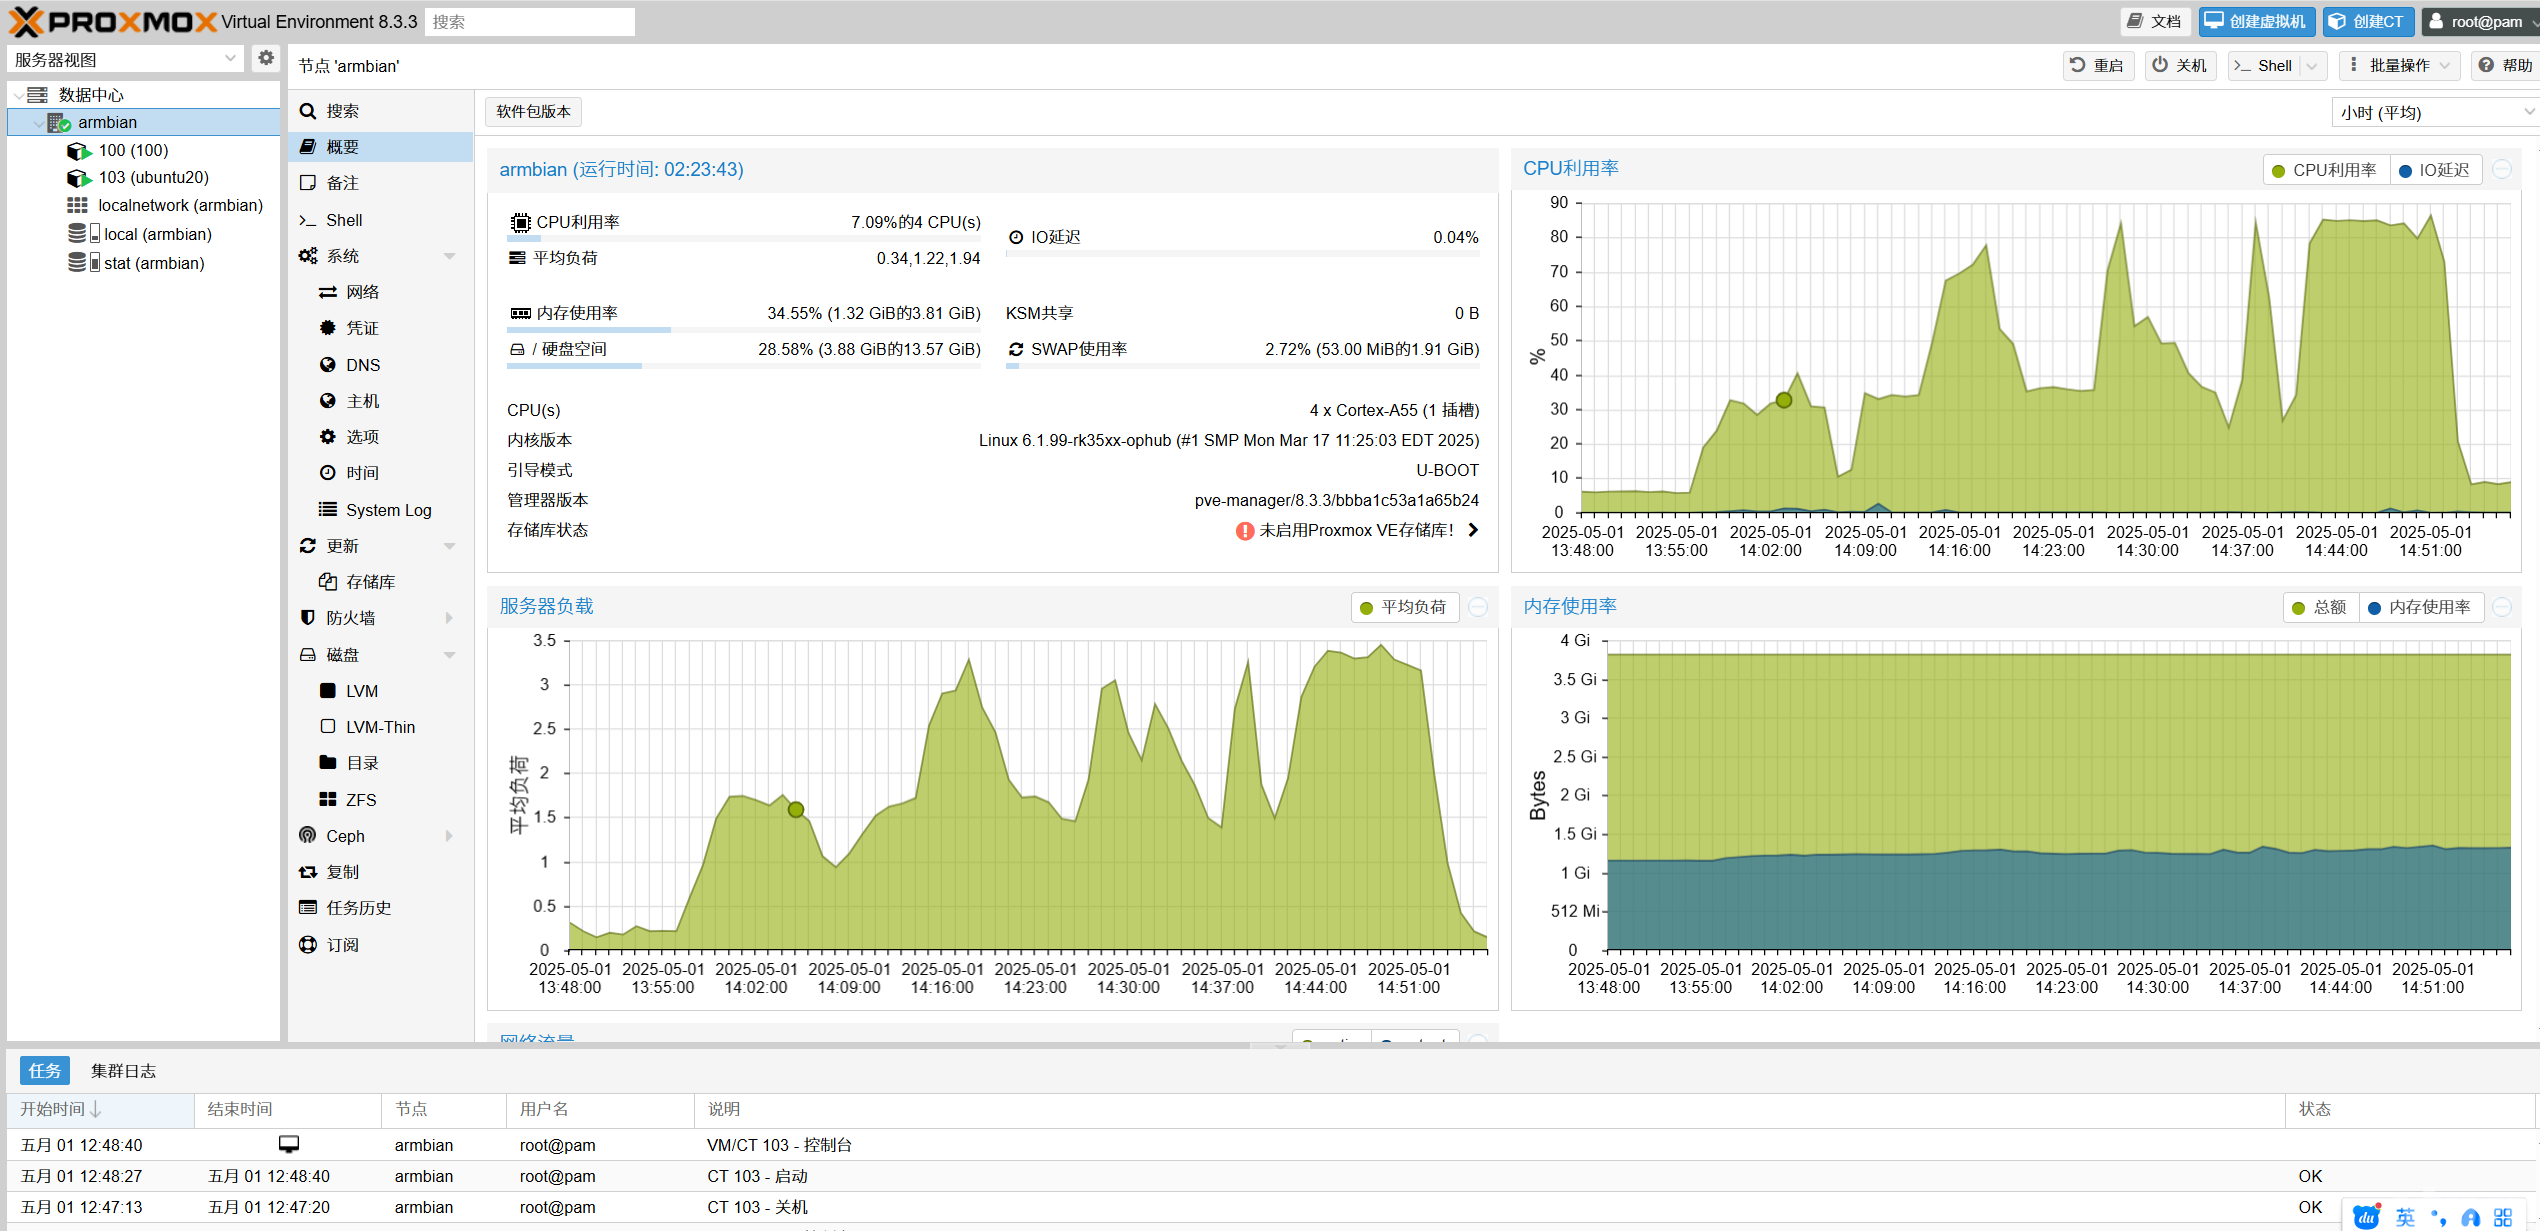
本教程为OEC安装PVE,镜像使用的是Flash_Armbian_25.05.0_rockchip_efused-wxy-oec_bookworm_6.1.99_server_2025.03.20.img
注意:处理器是不支持KVM的所以安装后只能跑LXC容器,下载ARM版本的CT模板系统即可,常见的系统也都有使用上基本都能满足也没啥限制,处理器性能就那样凑合用
需要安装PVE先刷对应镜像再继续
百度网盘:https://pan.baidu.com/s/1w_Rt0ckVd70kBqk8fX8pAg?pwd=qv2g
夸克网盘:https://pan.quark.cn/s/f10b717e2e8c
迅雷网盘:https://pan.xunlei.com/s/VOPGMM2RpLoLl7fLi6wTKq4QA1?pwd=jn7k#
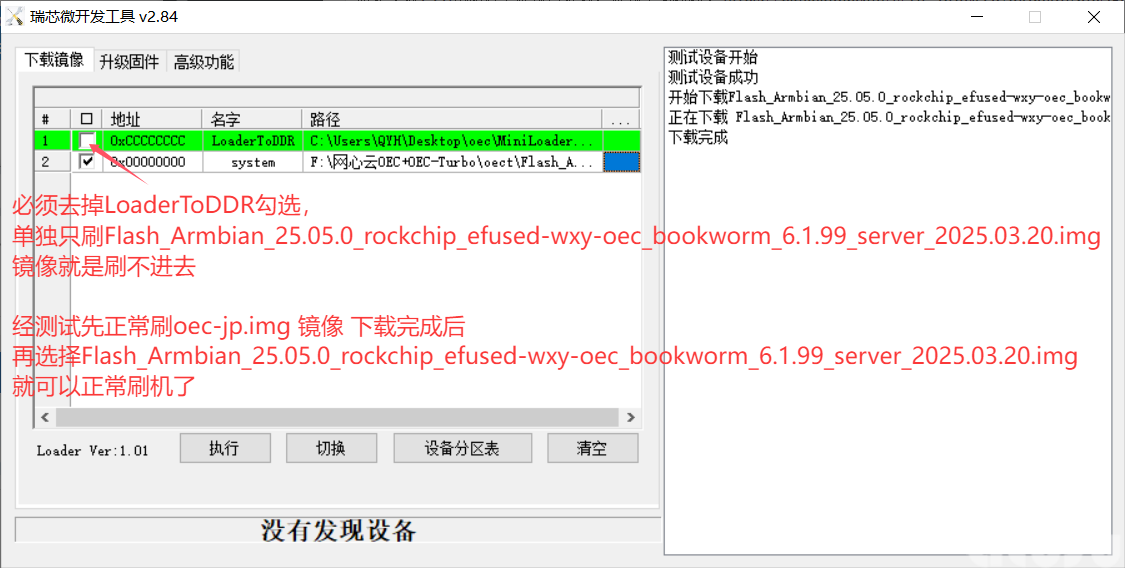
刷的时候要去掉 LoaderToDDR 勾选,具体如何刷机自行百度或者到恩山论坛查询教程很多就过多说明了。
单独只刷Flash_Armbian_25.05.0_rockchip_efused-wxy-oec_bookworm_6.1.99_server_2025.03.20.img 镜像可能会刷不进去
经测试先正常刷oec-jp.img 镜像 下载完成后 再选择Flash_Armbian_25.05.0_rockchip_efused-wxy-oec_bookworm_6.1.99_server_2025.03.20.img 就可以正常刷机了
此方法适用于所有ARM架构的服务器及盒子,只要是基于debian 12的都可以使用此方式安装PVE
发现一个问题不能创建debian系统的容器,别的系统都可以就是debian创建不是创建不成功就是创建后不能配置网络或者启动失败
因此不要创建debian的容器创建别的即可,比如ubuntu和其他的都是正常的
修改换源到第一步避免安装工具过慢
1、换源,更换系统源和添加PVE源
直接删除/etc/apt/sources.list.d/下的所有文件
sudo rm -rf /etc/apt/sources.list.d/*使用nano编辑器打开/etc/apt/sources.list文件
nano /etc/apt/sources.list把下面的源复制粘贴进去,粘贴后检查一下是否有误,有些编辑器复制进去会内容会断头的,就是第一行会被删几个字符自行检查好
deb https://mirrors.tuna.tsinghua.edu.cn/debian/ bookworm main contrib non-free non-free-firmware
# deb-src https://mirrors.tuna.tsinghua.edu.cn/debian/ bookworm main contrib non-free non-free-firmware

deb https://mirrors.tuna.tsinghua.edu.cn/debian/ bookworm-updates main contrib non-free non-free-firmware
# deb-src https://mirrors.tuna.tsinghua.edu.cn/debian/ bookworm-updates main contrib non-free non-free-firmware

deb https://mirrors.tuna.tsinghua.edu.cn/debian/ bookworm-backports main contrib non-free non-free-firmware
# deb-src https://mirrors.tuna.tsinghua.edu.cn/debian/ bookworm-backports main contrib non-free non-free-firmware

deb https://mirrors.apqa.cn/proxmox/debian/pve bookworm port
# 这是PVE 源直接一起加就行了
2、添加key
curl https://mirrors.apqa.cn/proxmox/debian/pveport.gpg -o /etc/apt/trusted.gpg.d/pveport.gpg3、更新源和升级软件
apt update && apt full-upgrade -y4、编辑 /etc/hosts 文件
sudo nano /etc/hosts原本的host文件
127.0.0.1 localhost
127.0.1.1 armbian
::1 localhost armbian ip6-localhost ip6-loopback
fe00::0 ip6-localnet
ff00::0 ip6-mcastprefix
ff02::1 ip6-allnodes
ff02::2 ip6-allrouter
更新内容如下,IP按你自己的对应修改,直接删除原来的把下面的改成你的IP复制进去也行:
127.0.0.1 localhost.localdomain localhost
192.168.0.178 armbian.pvetest.com armbian
::1 localhost ip6-localhost ip6-loopback
fe00::0 ip6-localnet
ff00::0 ip6-mcastprefix
ff02::1 ip6-allnodes
ff02::2 ip6-allrouters
5、重新启动网络服务
sudo systemctl restart systemd-networkd6、验证配置
hostname --ip-address输出如下就可以了
root@armbian:~# hostname --ip-address
::1 192.168.0.178
7、安装并启用 ifupdown2
dpkg -l | grep ifupdown2有输出就是安装了,没输出就是没安装进行安装
sudo apt install ifupdown28、安装一些工具
sudo apt install bridge-utils isc-dhcp-client -y9、配置固定静态IP
编辑/etc/network/interfaces 文件,创建vmbr0 桥接网络
sudo nano /etc/network/interfaces复制下面内容填入,IP和网关改成你自己的
auto lo
iface lo inet loopback

iface eth0 inet manual

auto vmbr0
iface vmbr0 inet static
address 192.168.0.178/24
gateway 192.168.0.1
bridge-ports eth0
bridge-stp off
bridge-fd 0

source /etc/network/interfaces.d/*
10、 禁用 NetworkManager
查询是否使用 NetworkManager 有输出网卡就是使用了
nmcli device status停止 NetworkManager服务并禁用它
sudo systemctl stop NetworkManager
sudo systemctl disable NetworkManager
11、卸载 NetworkManager
sudo apt remove --purge network-manager12、停止并禁用 systemd-resolved 服务
查询是否启用 systemd-resolved
systemctl status systemd-resolved如果启用就停止
sudo systemctl stop systemd-resolved
sudo systemctl disable systemd-resolved
13、删除符号链接 /etc/resolv.conf
sudo rm /etc/resolv.conf14、卸载 systemd-resolved
sudo apt remove --purge systemd-resolved15、手动创建 /etc/resolv.conf
sudo nano /etc/resolv.conf复制下面内容到里面
nameserver 8.8.8.8
nameserver 8.8.4.4
16、重新启动网络服务
保存并退出编辑器后,重新启动网络服务来应用新的静态 IP 配置
sudo systemctl restart networking重新加载所有配置
sudo ifreload -a17、 检查网络配置
使用ip a 命令检查新的网络配置是否生效:
ip a您应该能看到vmbr0 接口的 IP 地址为您设置的静态 IP(如 192.168.0.78)IP是上面配置的
18、 测试连接
ping www.baidu.com配置好网络后最好重启一下,不重启也行无所谓
19、开始安装PVE
apt install proxmox-ve postfix open-iscsi chrony -y20、配置开机自启,这个应该默认就配置了不确定因为有几次安装始终没启动都是手动启动的弄上吧
systemctl enable pvedaemon
systemctl enable pve-cluster
如果安装过程提示:Please select the mail server configuration type that best meets your needs. 则选择No configuration。
安装完毕即可通过主机当前ip加上端口访问,如https://你的IP:8006
用户名为root,密码为Debian系统的root密码
安装后访问不了先检查一下是不是没启动,如果启动了访问不了大概率是证书问题就操作下面部分的,重新生成证书
查询PVE状态
systemctl status pvedaemon
systemctl status pve-cluster
如果未启动就启动服务
systemctl start pvedaemon
systemctl start pve-cluster
启用 pvedaemon 和 pve-cluster 服务开机自启
systemctl enable pvedaemon
systemctl enable pve-cluster
确认服务的自启状态
systemctl is-enabled pvedaemon
systemctl is-enabled pve-cluster
证书的修复
sudo pvecm updatecerts手动删除并重新生成证书:
sudo rm -f /etc/pve/local/pve-ssl.key /etc/pve/local/pve-ssl.pem
sudo pveproxy restart
尝试重新生成证书:
generating pve root certificate failed手动生成根证书
sudo openssl genpkey -algorithm RSA -out /etc/pve/priv/pve-root-ca.key
sudo openssl req -new -x509 -key /etc/pve/priv/pve-root-ca.key -out /etc/pve/pve-root-ca.pem -days 3650 -subj "/CN=Proxmox Virtual Environment/OU=Cluster/O=PVE"
重启相关服务
sudo systemctl restart pveproxy
sudo systemctl restart pvedaemon
然后再访问应该就可以了
如果后期安装了宝塔的即可安装环境必须要使用编译安装要不安装不上
如果创建容器失败或者配置网卡失败无法启动就执行下面的操作后重启系统即可
确认 /etc/network 权限正确
chmod 755 /etc/network
chown root:root /etc/network
确保 /etc/network/interfaces 文件权限正确
chmod 644 /etc/network/interfaces
chown root:root /etc/network/interfaces
确认 LXC 模板目录存在并且可写
ls -ld /var/lib/lxc
ls -ld /var/lib/lxc/*
如果目录缺失,可手动创建:
mkdir -p /var/lib/lxc
chmod 755 /var/lib/lxc
chown root:root /var/lib/lxc
删除所有临时文件和缓存文件,这会删除已下载CT模板,过后再下载一下即可
rm -rf /var/lib/vz/template/cache/*
rm -rf /var/lib/vz/images/*
清除网络接口配置缓存
rm -f /etc/network/interfaces.tmp*重启网桥配置
ip link set dev vmbr0 down
ip link set dev vmbr0 up
删除新创建启动失败的容器
重新启动网络服务
sudo systemctl restart networking
systemctl restart pveproxy
然后再去下载模板进行创建,如果还是创建失败或者创建成功无法启动无法配置网络就重启一下系统再继续操作
版权声明:《 OEC安装PVE 8.3.3 安装好PVE在上面随便安装别的系统再也不用担心系统挂掉又要重刷OEC了 》为qinyuhui网络收集,侵删!文中未注明的文章皆为网络收集。
最后编辑:2025-5-1 07:05:31


提示:本文章评论功能已关闭